
Visual Studio Toolbox Control Integration
The Most Complete Guide to Visual Studio Toolbox Control Integration
Libor Tinka, Lead Developer, ComponentOwl.com
Contents
1. Introduction
2. Prerequisites
3. Creating a Sample Control
4. Manual Toolbox Integration
5. Toolbox Integration using TCI
6. Toolbox Integration using DTE
7. Toolbox Integration using VSI Packages
8. Toolbox Integration using VSPackages
9. Toolbox Integration using VSIX Packages
10. Supporting Multiple Version of .NET Framework
11. Sample Source Code
1. Introduction
This tutorial is intended for developers who would like to distribute their WPF or WinForms controls and automatically put them into Visual Studio Toolbox during installation.
I struggled with Toolbox integration earlier because there are several possible approaches (harder to decide between them). Each approach have its own pros and cons and no overall comparison is provided. I wrote this tutorial to shed some light on the topic and spare you hours, maybe days of research and experimenting with aspects of Visual Studio (Toolbox) extensibility.
We will first take a look on Toolbox control integration in general to get a big picture. Each approach will be then discussed in detail and the following question will be answered:
- How to install control in Visual Studio Toolbox?
- How to update the control?
- How to uninstall/remove the control?
- How to support multiple Visual Studio versions?
There are several options on how to integrate your controls with Visual Studio Toolbox:
- Manual installation
- Toolbox Control Installer (TCI)
- Visual Studio Automation Object Model (DTE)
- VSPackage
- VSI package
- VSIX package
Manual installation
The simplest way of adding control into Visual Studio Toolbox is from within the IDE.
This approach have one crucial drawback, which is that you leave Toolbox integration to the user. Many developers are not that experienced with Visual Studio and when your component is shipped, even if you provide appropriate step-by-step guide, they may find it too complicated and rather try another component which "just works". I thought that every developer using Visual Studio is experienced enough to know how to add new items in VS Toolbox, but I received few e-mails from users who uninstalled the product just because the component have not appeared in the Toolbox and they thought it is broken (without reading our documentation, of course). On the other hand, there is a group of users who are not experienced developers, but are in charge of trying some products in a given company (e.g. project managers). These people can install the component, play with it and they would really appreciate if it just works. This increases chance they will actually purchase your product.
Advantages: zero effort
Disadvantages: require experienced users, slows user
producitivity, updating controls is not intuitive
Toolbox Control Installer (TCI)
Visual Studio 2005 SDK contained a VSPackage called Toolbox Control Installer. This package comes pre-installed with Visual Studio 2008 and newer. Its job is to simplify the specific task of extending Visual Studio Toolbox. This approach requires you to install your assembly in GAC (Global Assembly Cache) and create a key in Windows Registry.
Advantages: simple and fast component installation, updating
and removing
Disadvantages: requires installation in GAC (not always
wanted), VS 2005 supported with SDK only
Visual Studio Automation Object Model (DTE)
If you are not afraid of COM, you can try DTE (Development Tools Environment) approach. There is already a project on CodePlex called Visual Studio Toolbox Manager, which solves the toolbox integration problem using a simple command-line application. The project is outdated since it does not support Visual Studio 2010 and newer. I made a project called DteToolboxInstaller, which is also a command-line application and does support Visual Studio 2013, 2012, 2010, 2008 and 2005. You can use the project as you like. The main disadvantage of DTE approach is the speed. The installer have to run devenv.exe using the automation interface, create a fake VS Solution, open Toolbox, add the stuff and then close the Solution. The whole process take no less than 10 seconds. If you want to integrate with two or three versions of Visual Studio, it can take well over a minute.
Advantages: does not require updating registry or GAC, full
control over Toolbox
Disadvantages: very slow, separate installation required for
every version of Visual Studio
VSPackage
A VSPackage seems to be a natural option. VSPackages allow any type of Visual Studio extension and you can manipulate Toolbox as well. There was a trouble with VSPackages in providing a Package Load Key (PLK) which can be generated only manually using web form. The requirement for PLK vanished with Visual Studio 2010 (hooray!). The nice thing about VSPackage approcach is that it does not slow down the installation process. The package is loaded and the controls are installed on-demand (when the Toolbox is opened for the first time after installation). After trying all the approaches, using VSPackage seems to be fastest and most universal one.
Advantages: quick installation, appearance in About box and
other extensibility features
Disadvantages: cmplicated setup, each component requires its
own package if shipped separately
VSI Package
VSI packages are quite old but you can use them for integration with Visual Studio 2005 and newer. It have very simple structure and you can create one even without Visual Studio. The only trouble with VSI compared to other approaches is invoking a wizard form which cannot be suppressed. The installation just cannot run in "quiet" mode. Another trouble with VSI is that a digital signature is required in order to get rid of a warning dialog. Your control will be always installed under "My Controls" tab in the Toolbox, which is not always desirable.
Advantages: simple creation, installer provided by Visual
Studio, automated creation and signing requires several specific steps
Disadvantages: no quiet mode (extra steps when custom installer
is used), manual uninstallation
VSIX Package
VSIX packages came with Visual Studio 2010 so you can integrate with 2010 or newer. the .VSI and .VSIX file extensions are associated with Visual Studio so you can simply double-click it or run it via shell. You can also run VsixInstaller.exe utility that performs the installation. Good news: No more nag screens when VSIX is not signed - the installer only contains a dialog with simple text: "This extension does not contain a digital signature." Even better news: The VsixInstaller supports quiet mode!
Please note that VSI and VSIX package installers contain features like displaying EULA, choosing which components to install or localization. When deploying your controls for use in Visual Studio, you won't need an installer on top of the package.
Advantages: installer provided by Visual Studio, quiet mode,
fast installation
Disadvantages: package project required, automated creation is
complicated, no support for VS 2005 and 2008
Comparison of Approaches
Here is a table summarizing features of the discussed approaches. As you can see, the VSPackage approach gives you the most freedom, but is also hardest to implement. We will discuss every approach so that you will be able to impement the one that suits you best.
| 2005 | 2008 | 2010 | 2012 | 2013 | Speed | Install Automation | Uninstall automation | |
| Manual installation | depends on user | |||||||
| TCI | fast | |||||||
| EnvDTE | slow | |||||||
| VSI | moderate | |||||||
| VSIX | moderate (faster than VSI) | |||||||
| VSPackage | fast |
2. Prerequisites
We will focus on integration with Visual Studio 2010, 2012 and 2013. Hence you will need:
- Visual Studio 2010 (or 2012, 2013)
- Visual Studio 2010 SDK (or 2012 SDK, 2013 SDK)
- Microsoft Windows SDK
The VS SDK contains regpkg.exe tool and project templates discussed in VSIX and VSPackage approaches.
The Windows SDK contains gacutil.exe, guidgen.exe, signtool.exe and other useful tools.
There are two kinds of versioning used for Visual Studio. One is based on the release name (e.g. Visual Studio 2008) and the other is a classic version number (e.g. 8.0). Both will be used, so it should be noted which version numbers correspond to which versions of Visual Studio:
| Release name | Version number |
| Visual Studio 2005 | 8.0 |
| Visual Studio 2008 | 9.0 |
| Visual Studio 2010 | 10.0 |
| Visual Studio 2012 | 11.0 |
| Visual Studio 2013 | 12.0 |
3. Creating a Sample Control
We will start by creating simple WinForms control for integration in VS Toolbox.
You can start with File - New - Project... (Control+Shift+N) and select Windows Forms Controls Library template.
Of course, you can also create empty Class Library project, add references to System.Drawing and System.Windows.Forms and create a new control. In fact, any DLL containing public classes derived from Control will suffice.
We want to support .NET Runtime version 4.0 and 4.5, so the control should be built against .NET 4.0 to ensure compatibility (the lower framework version you use, the wider range of compatible frameworks since they are backward compatible). It should be noted that .NET 4.5 is an in-place update of .NET 4.0 and hence the 4.5 assemblies will work on machines with 4.0 runtime installed unless you use some feature specific to 4.5.
If you have multiple controls in your assembly and don't want to use some of them in Toolbox, decorate them with ToolboxItem attribute with defaultType parameter set to false:
[ToolboxItem(false)]
public class InvisibleControl : UserControl
{
  ...
}
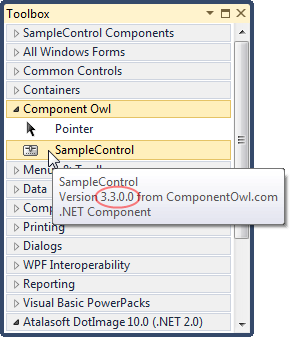
I have created a very simple control called SampleControl:
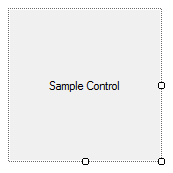
Finally, I set version of the assembly 3.3.0.0 (I chose just something else than 1.0.0.0 to see where the specific version number appears).
Custom Transparent Icon for the Toolbox
Icons for Toolbox are 16 by 16 pixel images. Various image formats are supported (BMP, JPEG, PNG and ICO). However, you need to create 256-color BMP image to ensure transparency. The transparent color is determined by bottom left pixel of the icon. Transparency works for magenta (#ff00ff):
![]()
The icon file should have same name as the control class (i.e. SampleControl.BMP).
Finally, use ToolboxBitmapAttribute to link icon with the control class:
[ToolboxBitmap(typeof(SampleControl), "Resources.SampleControl.bmp")]
public partial class SampleControl : UserControl
{
	...
}
Note that icon location matters, at least in C#. Since I have added the icon under custom folder named Resources, I need to reference Resources.SampleControl.bmp instead of just SampleControl.bmp.
Here is the resulting transparent icon in Toolbox:
Marking the Control as Toolbox Item
We can mark control as toolbox item by adding a ToolboxItemAttribute with defaultType parameter set to true:
[ToolboxItem(true)]
public partial class SampleControl : UserControl
...
This decoration is optional since the controls within assembly are considered toolbox items by default. However, we can mark certain control classes with ToolboxItem(false) to hide them from Toolbox. This comes in handy when we have multiple projects and there are too many controls in the Toolbox because loaded from all the other projects.
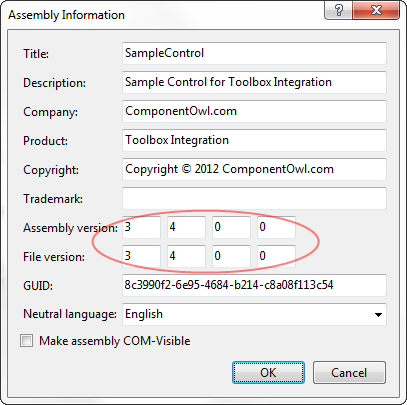
Signing the Assembly
The assembly containing controls (SampleControl.dll in our case) should be strongly named if we want them installed in GAC (Global Assembly Cache) later on. This is optional in most cases, but the Toolbox Controls Installer approach requires the assembly being installed in GAC, hence the strong name is necessary there.
To give an assembly a strong name, open project properties and find Signing tab:
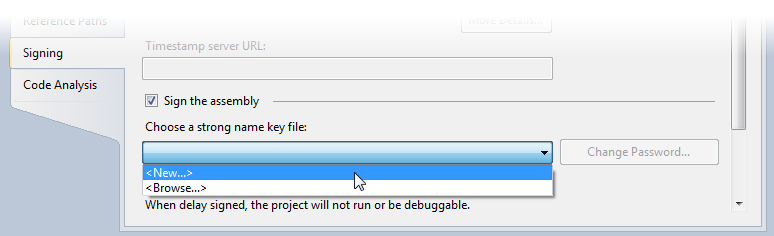
Check the "Sign the assembly" option and select "<New...>" from the combo box. This will create a new .SNK file in your project which will be used to sign the assembly. You can also browse for existing key file. If you want to distribute multiple assemblies with custom controls, it is a best practice to use same strong name key for each assembly (it is possible to have one .SNK file located in Solution folder and put just a link to that file in each project; when we browse for the key under the Signing tab, the link will be used without copying the file).
The SNK (Strong Name Key) file is basically a private key to digitally sign your assembly. There is also a public key which can be used to verify the assembly and its shorter variant called "public key token" for assembly identification.
4. Manual Toolbox Integration
Installing
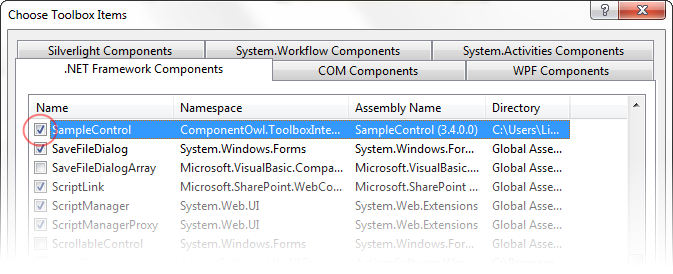
To install component into Visual Studio Toolbox manually, open some form or control in designer, open the Toolbox window (Control+Alt+X), right-click on the Toolbox window and select "Choose Items...":
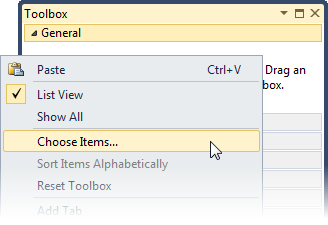
The "Choose Toolbox Items" dialog will show up:
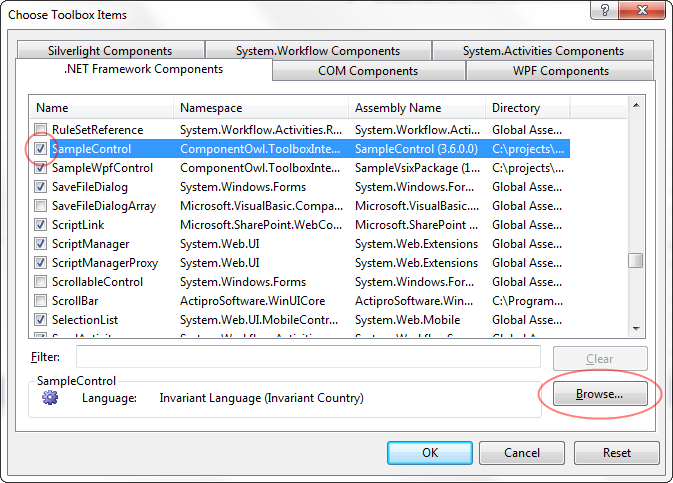
You can browse for DLL file with your component by clicking the "Browse..." button.
This is the simplest way of putting component in the Toolbox without extra actions required.
This can be unpleasant for end-users since it means many clicks they have to perform. I will explain how to integrate a component a little bit more so that it will be visible under the ".NET Framework Components" tab in the above dialog box and possibly show up in Toolbox automatically without extra effort of the user.
Making the Control Visible in "Choose Toolbox Items" Dialog Box
As you can see on the above picture, the SampleControl component is already displayed in the dialog box under ".NET Framework Components" tab.
This is because the folder containing our control is registered as "assembly folder" in the registry and hence is searched when the above dialog is populated.
You can register your own assembly this way by creating a key in registry:
32-bit OS: HKLM\SOFTWARE\Microsoft\.NETFramework\AssemblyFolders\<your control name>
64-bit OS: HKLM\SOFTWARE\Wow6432Node\Microsoft\.NETFramework\AssemblyFolders\<your control name>
You can also create key for specific version of .NET runtime (this comes in handy if you distribute different components for different versions of .NET):
32-bit OS: HKLM\SOFTWARE\Microsoft\.NETFramework\v4.0.30319\AssemblyFoldersEx\<your control name>
64-bit OS: HKLM\SOFTWARE\Wow6432Node\Microsoft\.NETFramework\v4.0.30319\AssemblyFoldersEx\<your control name>
In both cases, the default value for the key is a string with full path to the folder with your assembly.
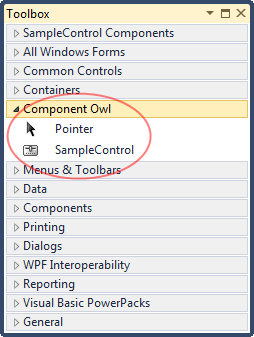
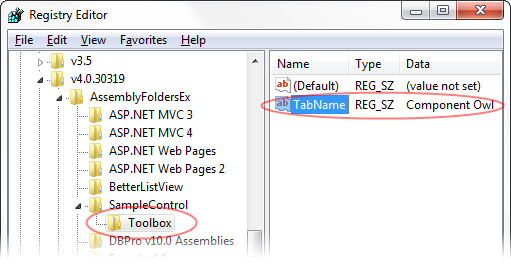
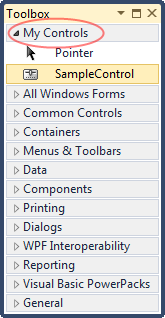
You can specify Toolbox tab in which the component should show up by adding subkey named "Toolbox" with single string value "TabName" this value has Toolbox tab name as data. When you add such control in the Toolbox, it will reside under new tab with the specified name:
The control should also appear in "Choose Toolbox Items" dialog box if it is installed in Global Assembly Cache.
The control pops up in the Toolbox automatically in its own tab in Visual Studio 2012/2013.
Installing the Control in GAC
The benefit of GAC (Global Assembly Cache) is that the user needs not to browse for your control. He will just select it form the above dialog box without having to know where it is actually installed (the dialog is populated by controls from "assembly folders" and from the GAC).
The GAC have one useful feature and disadvantage at the same time: It allows holding multiple versions of the same assembly. When user makes reference to your control from GAC and set "Specific Version" to true in Reference Properties window, it will be tied to that version. When you install an "update", a new version will be added to GAC, but the user will stay with the older one. Of course, the "Choose Toolbox Items" dialog will show both versions, so the user can just replace old reference with the new one.
You can make the installer removing any older versions from GAC during installation and add/keep just the newest one. This will force the user to replace the reference since it breaks the build.
You can work with GAC by using tool called gacutil.exe or from code. We will discuss both approaches.
The gacutil.exe is located in Microsoft Windows SDK directory. There are two such extecutables:
c:\Program Files (x86)\Microsoft SDKs\Windows\v7.0A\Bin\gacutil.exe
c:\Program Files (x86)\Microsoft SDKs\Windows\v7.0A\Bin\NETFX 4.0 Tools\gacutil.exe
The former is for .NET Framework up to version 3.5. The latter is for .NET 4.0 and higher. This is for compatibility reasons as a separate GAC have been introduced with .NET 4.0.
You can install an assembly to GAC by calling:
gacutil.exe /i SampleControl.dll
To uninstall it, we refer to our assembly by its assembly name, not file name:
gacutil.exe /u SampleControl
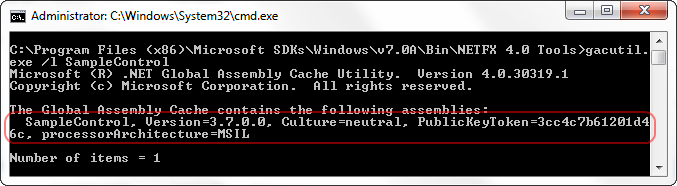
Finally, you can check if the assembly is installed in GAC by listing any instances of the provided name:
gacutil.exe /l SampleControl
It is not wise, however, to use gacutil.exe from a custom installer as it is located in SDK that user might not have installed. Furthermore, the SDK license does not allow bundling gacutil.exe with your installer.
Some installers like Inno Setup or MSI allow installing in GAC anyway.
You can also work with GAC using System.EnterpriseServices.Internal.Publish class. The class have two methods: GacInstall and GacRemove. Both methods take just path to assembly file as a parameter, so for example:
(new Publish()).GacInstall(assemblyPath);
will install the specified assembly in GAC.
Updating
Updating the control depends on how it is installed and referenced.
If you have added component in the Toolbox manually via "Choose Toolbox Items" dialog box and "Browse..." button, i.e. as a file reference, the default property of such reference is that it simply points to the specified file no matter which version it have (unless user sets "Specific Version" to true in reference properties window; the default is false in this case). Simply replacing the DLL with the control by a newer file will suffice. If the user have specified "Specific Version" to true, the build will break because the reference is no longer valid. He needs to replace the reference by a new one pointing on the same file which now have newer version.
If you have added the component from GAC (these components also appear in the "Choose Toolbox Items" dialog box), the "Specific Version" property of the reference is true by default:
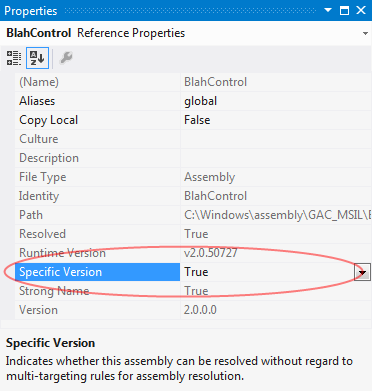
This means that even if you install a newer version of the component in GAC, the project will still reference the older version and both versions will reside in GAC.
If you remove all versions of the component from GAC (e.g. using gacutil.exe) and then install just the newest one, the build will break unless the user changed "Specific Version" property to false.
Removing
Removing the manually installed control consists of just reverting all the steps done during the installation.
In case of file references, deleting the file is sufficient.
In case of tighter integration (GAC, registry), the registry keys need to be deleted and the control can be removed from GAC (e.g. using gacutil.exe).
Resetting Toolbox and Clearing the Toolbox Cache
The Toolbox can fall into state where it does not display some items, some are duplicate and some can be disabled. Sometimes the only remedy is to let Visual Studio rebuild the Toolbox from scratch.
To do that, right-click on the Toolbox window and select "Reset Toolbox". Visual Studio will go through all the installed packages and reloads components into the Toolbox.
If this won't help, you can perform hard reset of the Toolbox. Exit Visual Studio and delete all .TBD files in the following folder:
\Users\<user>\AppData\Local\Microsoft\VisualStudio\10.0\
It should be up to four files:
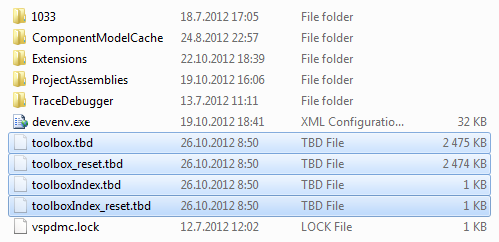
Once removed, start Visual Studio again. After showing the Toolbox, all items should load instead of loading only the cached versions.
5. Toolbox Integration using TCI
Installing
Toolbox Control Installer is a VS package pre-installed in Visual Studio 2008 and newer. It looks in Windows registry for components and loads them in the Toolbox.
Before using TCI, one can check if it is installed in the given version of VS. For example, the following registry key should exist if the Visual Studio 2010 have TCI installed:
32-bit OS: HKLM\SOFTWARE\Microsoft\VisualStudio\10.0\Packages\{2c298b35-07da-45f1-96a3-be55d91c8d7a}
64-bit OS: HKLM\SOFTWARE\Wow6432Node\Microsoft\VisualStudio\10.0\Packages\{2c298b35-07da-45f1-96a3-be55d91c8d7a}
The TCI package GUID is always the same so you can make the check for any version of Visual Studio with the above key (only change the version number from 10.0 to corresponding version number, of course).
The only prerequisites for the assembly is that it should have strong name (i.e. to be signed). See section "Creating the Sample Control" for more information.
The installation consists of putting the control in GAC (see previous section for more information) and creating registry keys.
Suppose we have the SampleControl installed in GAC:
We will make reference to this assembly from registry by creating the following key:
32-bit OS: HKLM\SOFTWARE\Microsoft\VisualStudio\10.0\ToolboxControlsInstaller\SampleControl, Version=3.7.0.0, Culture=neutral, PublicKeyToken=3cc4c7b61201d46c
64-bit OS: HKLM\SOFTWARE\Wow6432Node\Microsoft\VisualStudio\10.0\ToolboxControlsInstaller\SampleControl, Version=3.7.0.0, Culture=neutral, PublicKeyToken=3cc4c7b61201d46c
The default value for the key is the Toolbox tab name name you would like to have for the component(s), e.g. "Component Owl".
Installing in Visual Studio 2012 and 2013
One extra step is required to make this work in Visual Studio 2012/2013, which is adding the registry key also in its user config hive, i.e.:
HKCU\Software\Microsoft\VisualStudio\11.0_Config\ToolboxControlsInstaller\SampleControl, Version=3.7.0.0, Culture=neutral, PublicKeyToken=3cc4c7b61201d46c
for VS 2012. Use 12.0_Config for VS 2013.
Updating
Updating the component is very simple. Just modify the above registry keys by changing the version number.
Removing
To remove the component, delete the above registry keys. You should also remove the corresponding assembly from GAC.
Automating Integration with TCI using TciToolboxInstaller
I made a simple command-line application called TciToolboxInstaller which does all the described steps. The usage is simple:
TciToolboxInstaller.exe [install|uninstall] [vs2005|vs2008|vs2010|vs2012|vs2013] [tab name] [assembly path]
For example, if you like to install SampleControl.dll in Visual Studio 2012 Toolbox, just call:
TciToolboxInstaller.exe install vs2012 "Component Owl" SampleControl.dll
You can use quotes for the last two parameters if they contain spaces.
The TciToolboxInstaller project is contained in sample source code.
6. Toolbox Integration using DTE
Installing
The DTE (Development Tools Environment) approach does not require working with GAC or registry. It remotely manipulates Visual Studio Toolbox and adds/removes items as needed.
The whole installation is done from (managed) code using COM wrappers. It works in the following steps:
- Check if an instance of Visual Studio is not running. If not, continue.
- Retrieve an EnvDTE.DTE object corresponding to the version of Visual Studio we want to integrate with.
- Create a "dummy" project using the DTE object
- Obtain Toolbox window and ToolBox object from it.
- Find or create ToolBoxTab object.
- Add item in the Toolbox tab (ToolBoxTab.ToolBoxItems.Add).
- Wait until current instance of Visual Studio stops running.
Here are some of the step/strongs in C# code - it is an excerpt from DteToolboxInstaller project provided in sample source code:
// obtain a DTE object
Type typeDTE = Type.GetTypeFromProgID("VisualStudio.DTE.11.0");

DTE dte = (DTE)Activator.CreateInstance(typeDTE, true);

// create a temporary file
string tempFile = Path.GetFileNameWithoutExtension(Path.GetTempFileName());
string tempDirectory = string.Format("{0}{1}", Path.GetTempPath(), tempFile);

// create Visual Studio Solution
Solution4 solution = (dte.Solution as Solution4);

string templatePath = solution.GetProjectTemplate(TemplateName, "CSharp");

solution.AddFromTemplate(templatePath, tempDirectory, DummyProjectName, false);

// get Toolbox window
Window window = dte.Windows.Item(Constants.vsWindowKindToolbox);

// get Toolbox
ToolBox toolBox = (ToolBox)window.Object;

// get Toolbox tab
ToolBoxTab toolBoxTab = (GetToolBoxTab(toolBox.ToolBoxTabs) ?? toolBox.ToolBoxTabs.Add(this.tabName));

// add new item under the Toolbox tab
toolBoxTab.ToolBoxItems.Add(assemblyName, this.assemblyPath, vsToolBoxItemFormat.vsToolBoxItemFormatDotNETComponent);

// select the Toolbox tab
toolBoxTab.Activate();

// cleanup
dte.Solution.Close(false);
dte.Quit();
Marshal.ReleaseComObject(dte);

// wait till Visual Studio turns off completely
if (IsVisualStudioRunning())
{
	Thread.Sleep(VisualStudioProcessTimeout);
}
There are several obstacles on implementing the DTE approach.
First of all, we need to ensure that Visual Studio is not running during the installation - this is because we want messages sent to Visual Studio instance will arrive in the "invisible" one ran from our code and not the one which the user have currently opened.
Similarly, we would like to wait a while until the instance terminates after installation. This is necessary when integrating with multiple versions of Visual Studio when just a single instance have to be running at a time. Doing two installations too quickly in succession may cause the previous one to fail because a Visual Studio instance is still running.
The communication between our code and Visual Studio is mediated by OLE message filter which needs to be implemented. You can take a look on DteToolboxInstaller (see below) source code, where is a working installer implemented that uses this approach.
Updating and Removing
Since we have full control over the Toolbox with this approach, updating or removing items/tabs is done with the corresponding DTE objects.
Automatic Integration with DTE using DteToolboxInstaller
I made a simple command-line application called DteToolboxInstaller which does all the necessary steps and solves the deals with the discussed obstacles. The usage is simple:
DteToolboxInstaller.exe [install|uninstall] [vs2005|vs2008|vs2010|vs2012|vs2013] [tab name] [assembly path]
For example, if you like to install SampleControl.dll in Visual Studio 2012 Toolbox, just call:
DteToolboxInstaller.exe install vs2012 "Component Owl" SampleControl.dll
You can use quotes for the last two parameters if they contain spaces.
The DteToolboxInstaller project is contained in sample source code.
7. Toolbox Integration using VSI Packages
Let's consider you don't have a custom installer and want to distribute your components in some kind of simple extension package that Visual Studio understands.
Visual Studio contains an installer for so called VSI packages that will do the integration work for you. If you have Visual Studio installed, the .VSI extension is already associated with the Visual Studio Content Installer.
Creating the VSI Package
I have created an empty folder and copied SampleControl.dll in it. All that is needed to make a VSI package is to create a .VSCONTENT file, which is simply a XML file satisfying Visual Studio Content Installer schema:
<VSContent xmlns="http://schemas.microsoft.com/developer/vscontent/2005">
    <Content>
        <FileName>SampleControl.dll</FileName>
        <DisplayName>SampleControl</DisplayName>
        <Description>ComponentOwl.com SampleControl</Description>
        <FileContentType>Toolbox Control</FileContentType>
        <ContentVersion>2.0</ContentVersion>
    </Content>
</VSContent>
The content is readable and pretty straightforward. The ContentVersion element can contain either "1.0" (support for Visual Studio 2005, 2008 and 2010) or "2.0" (support for Visual Studio 2008, 2010, 2012, 2013).
Now we zip the two files and rename extension of the archive to .VSI. We should end up with the following three files:

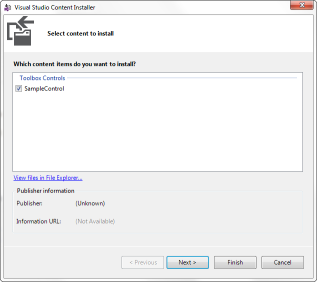
If you double-click the SampleControl.vsi, the Visual Studio Content Installer opens up. You can start the installer from command line as well:
32-bit OS: C:\Program Files\Common Files\Microsoft Shared\MSEnv\VSContentInstaller.exe SampleControl.vsi
64-bit OS: C:\Program Files (x86)\Common Files\Microsoft Shared\MSEnv\VSContentInstaller.exe SampleControl.vsi
The installer have a form o wizard:
Signing the VSI Package
By default, the VSI package is not signed. This causes showing: "Publisher: Unknown" label on the first page of the installation wizard and an unpleasant dialog box later on:
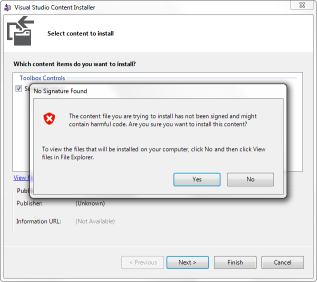
To avoid this, you need to digitally sign the VSI package. Of course, you have to own a digital certificate (usually an X.509 certificate stored in .PFX file).
Because we cannot sign ZIP files, we need to convert the .VSI file (which is actually a ZIP archive with just an altered extension) to self-extracting archive that the Visual Studio Content Installer recognizes. There is a tool called MakeZipExe to do this task:
MakeZipExe.exe -zipfile:SampleControl.vsi -output:SampleControl-unsigned.vsi -overwrite
The MakeZipExe tool is located at Visual Studio's binary folder:
c:\Program Files (x86)\Microsoft Visual Studio 11.0\Common7\IDE\MakeZipExe.exe
The second step is signing the .EXE file using signtool.exe. You can find signtool.exe in Microsoft Windows SDK, i.e.:
c:\Program Files (x86)\Microsoft SDKs\Windows\v7.0A\Bin\signtool.exe
Here is a sample usage of signtool.exe:
signtool.exe sign /du "http://www.componentowl.com/sample-control" /f certificate.pfx /p abc123 /t "http://timestamp.comodoca.com/authenticode" "SampleControl-signed.vsi"
When signed, the "Publisher" and "Information URL" labels are filled in the installer and no dialog box appears. The benefit of signing is obvious - your users will know they are installing trusted, possibly high-quality software and there is a higher chance of your software being used more widely (for example, the government sector usually require such certified software).
You can also add an EULA to your VSI package. This can be done by adding a comment metadata in the archive by ZIP archiver that supports such feature (e.g. WinZip).
Uninstalling the Control from Toolbox
As far as I know, the control cannot be removed from the Toolbox programmatically. You need to delete the control's DLL located at
c:\Users\<user>\Documents\Visual Studio 2010\Controls\
the same should be done for every version of Visual Studio installed.
In Visual Studio, right-click on Toolbox and select "Reset Toolbox". The component will not be found and disappear. Similarly, you can just delete the control from the Toolbox or select "Choose Items..." from context menu and untick the control there:
Drawbacks of Using VSI Package
One drawback of using VSI package is that the installer runs every version of VS IDE you have installed and which is supported by the package. The form will disappear eventually, but it lowers user experience.
Another drawback is that when you want to update your control, the installer offers whether to rename, replace or skip the file (e.g. SampleControl.dll). User have to decide to update, which also slows down installation and requires user interaction.
You also cannot specify custom Toolbox tab. All controls are installed under "My Controls" tab:
8. Toolbox Integration using VSPackages
This approach brings full control over the integration and other benefits. The VSPackages are loaded on-demand, so the integration process won't slow down a custom installer.
Although VSPackage and our sample control can be packed within the same assembly, we will create a separate Visual Studio Package project.
When user opens Toolbox in VS for the first time after installation, the IDE will look in registry for any registered packages and load them (if not loaded previously).
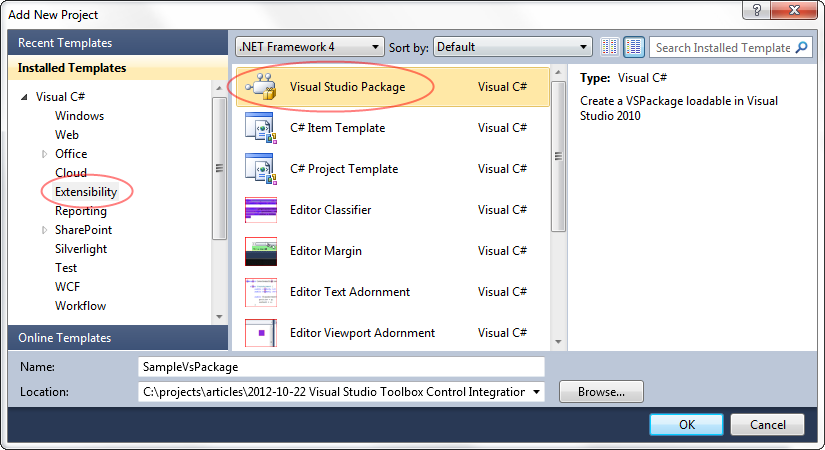
Creating VSPackage Project
We would like to have our VSPackage compatible with VS 2010, 2012 and 2013, so we will work in Visual Studio 2010.
Select "File - New - Project.." (Control+Shift+N) and select the "Visual Studio Package" template:
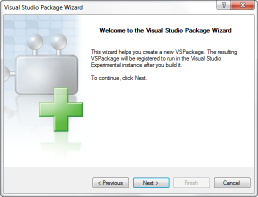
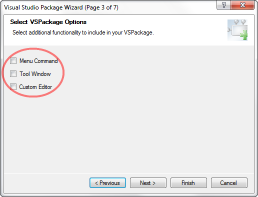
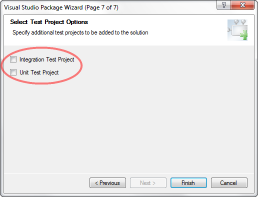
This will start a "Visual Studio Package Wizard":
You can leave most options in the wizard on defaults. Leave all the check boxes unchecked on "Page 3 of 7" and "Page 7 of 7":
Now we will take a look on the generated files. Open the Guids.cs file:
// Guids.cs
// MUST match guids.h
using System;

namespace ComponentOwl.ToolboxIntegration
{
    static class GuidList
    {
        public const string GuidSampleVSPackagePkgString = "00000000-8fdf-48b6-98f8-4ff21a3a4def";
        public const string GuidSampleVSPackageCmdSetString = "def6519d-5ace-4062-95d6-4ee43f4a5de9";

        public static readonly Guid GuidSampleVSPackageCmdSet = new Guid(GuidSampleVSPackageCmdSetString);
    };
}
Here are the GUIDs that uniquely identify your package. I have edited the first four hex digits of package identifier to "00000000" so that we can find it more easily later. This is just for purpose of convenience in our sample project. Always use randomly generated GUID in a real-world application. Visual Studio will generate a new GUID whenever you create a new VSPackage project.
You can also generate new GUIDs any time, for example using online GUID generator or guidgen.exe utility from Windows SDK. When these numbers are changed, your package will be different from Visual Studio's point of view.
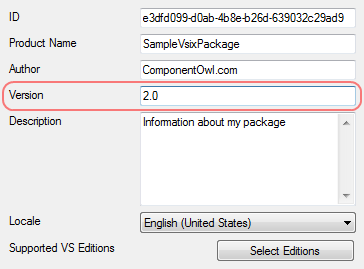
Another important file here is source.extension.vsixmanifest. If you double-click on the file in Solution Explorer, the VSIX Manifest Designer will show up:
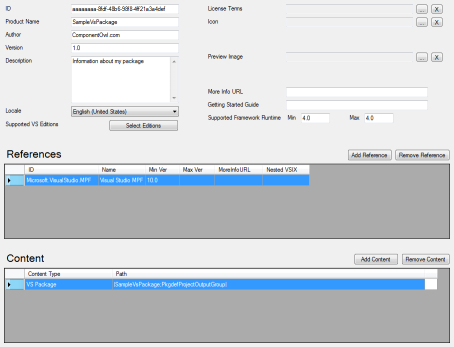
Not all the fields are mandatory, but I will fill all of them nevertheless:
- ID - Unique product "Identity" - the ID is limited to 100 characters and the recommended format is "Company.Product.Feature.Name". We can leave the VSPackage's GUID here.
- Product Name - This field is used for Toolbox Tab name, so I will put "Component Owl Controls" here.
- Author - Your name or company name - "ComponentOwl.com", for example.
- Version - This is version of the package and its contents. The format is same as for assembly versions: Major.Minor.Build.Revision. I will put "1.4.0.128" here.
- Description - Speaks for itself.
- Locale - Language for the package.
- Supported VS Editions - Here you can specify which editions of Visual Studio 2010 you would like to support. Of course, it can support VS 2012/2013 as well, but for now I will just check Ultimate, Premium and Professional editions.
- Supported Framework Runtime - Minimum and maximum .NET Framework Runtime versions your extension supports. Since my component will support 4.0 and 4.5 runtime, I will put 4.0 and 4.5 here.
Adding Support for Visual Studio 2012/2013
We have specified supported Visual Studio Editions in VSIX Manifest Designer, through the "Visual Studio Version and Edition" dialog box:

As you can see, only Visual Studio 2010 is supported here because VSIX is new to 2010 and of course VS 2010 does not know about 2012/2013. We have to source.extensions.vsixmanifest file for manual editing. Select the file in Solution Explorer and press F7 (View Code):
<?xml version="1.0" encoding="utf-8"?>
<Vsix xmlns:xsi="http://www.w3.org/2001/XMLSchema-instance" xmlns:xsd="http://www.w3.org/2001/XMLSchema" Version="1.0.0" xmlns="http://schemas.microsoft.com/developer/vsx-schema/2010">
  <Identifier Id="aaaaaaaa-8fdf-48b6-98f8-4ff21a3a4def">
    <Name>SampleVsPackage</Name>
    <Author>ComponentOwl.com</Author>
    <Version>1.0</Version>
    <Description xml:space="preserve">Information about my package</Description>
    <Locale>1033</Locale>
    <InstalledByMsi>false</InstalledByMsi>
    <SupportedProducts>
      <VisualStudio Version="10.0">
        <Edition>Ultimate</Edition>
        <Edition>Premium</Edition>
        <Edition>Pro</Edition>
      </VisualStudio>
    </SupportedProducts>
    <SupportedFrameworkRuntimeEdition MinVersion="4.0" MaxVersion="4.5" />
  </Identifier>
  <References>
    <Reference Id="Microsoft.VisualStudio.MPF" MinVersion="10.0">
      <Name>Visual Studio MPF</Name>
    </Reference>
  </References>
  <Content>
    <VsPackage>|%CurrentProject%;PkgdefProjectOutputGroup|</VsPackage>
  </Content>
</Vsix>
Take a look on the Vsix/Identifier/SupportedProducts/VisualStudio element (highlighted in bold). Copy and paste this element and modify Version attribute on the second one to "11.0":
<VisualStudio Version="11.0">
  <Edition>Ultimate</Edition>
  <Edition>Premium</Edition>
  <Edition>Pro</Edition>
</VisualStudio>
The edition tags are valid for version 11.0 because Visual Studio 2012 template generates the same edition names.
Writing Package Code
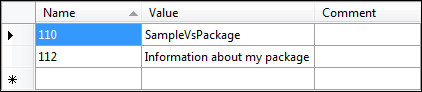
Now we will take a look on the VSPackage code itself. Open the SampleVSPackage.cs file. I kept only the necessary code and added the ProvideToolboxItems attribute:
[PackageRegistration(UseManagedResourcesOnly = true)]
[InstalledProductRegistration("#110", "#112", "1.0", IconResourceID = 400)]
[Guid(GuidList.guidSampleVsPackagePkgString)]
[ProvideToolboxItems(1)]
public sealed class SampleVsPackage : Package
{
}
Our VSPackage implementation inherits from Microsoft.VisualStudio.Shell.Package class and is decorated by three attributes:
- PackageRegistrationAttribute - Specifies that package registration tool should look for additional attributes (will be discussed later).
- InstalledProductRegistrationAttribute - Provides information for the Visual Studio splash screen and About box.
- GuidAttribute - Provides custom GUID for the class because automatic GUID is undesirable here (Visual Studio need to be able to trace our package by its unique ID).
- ProvideToolboxItemsAttribute - Specifies that the package provides toolbox items. There are various uses of VSPackages, but we are interested in intalling controls to Visual Studio Toolbox, hence this attribute.
The strings "#110" and "#112" in InstalledProductRegistrationAttribute refer to keys in VSPackage.resx. You can open this file and edit package name and description there:
Now we write methods within SampleVsPackage class that work with the Toolbox:
private const string ComponentFile = "SampleControl.dll";
private const string TabName = "Component Owl";

private void InstallToolboxItems()
{
    IToolboxService toolboxService = (IToolboxService)GetService(typeof(IToolboxService));

    foreach (ToolboxItem item in ToolboxService.GetToolboxItems(GetAssemblyName()))
    {
        toolboxService.AddToolboxItem(item, TabName);
    }
}

private void RemoveToolboxItems()
{
    IToolboxService toolboxService = (IToolboxService)GetService(typeof(IToolboxService));

    foreach (ToolboxItem item in ToolboxService.GetToolboxItems(GetAssemblyName()))
    {
        toolboxService.RemoveToolboxItem(item);
    }
}

private AssemblyName GetAssemblyName()
{
    string pathAssembly = String.Concat(
        Path.GetDirectoryName(GetType().Assembly.Location),
        Path.DirectorySeparatorChar,
        ComponentFile);

    return AssemblyName.GetAssemblyName(pathAssembly);
}
The method names InstallToolboxItems and RemoveToolboxItems speak for themselves. Both methods look for SampleControl.dll in the same location as the VSPackage's assembly. They get all toolbox items from the assembly and either put them under "Component Owl" tab or remove them.
The ToolboxService class comes from System.Drawing.Design and we need to add reference to this asssembly in order to use ToolboxService.
Building the Package
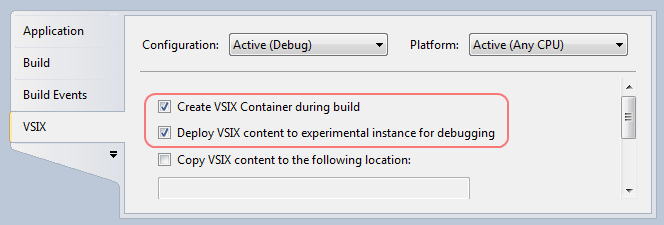
Before building the SampleVsPackage project, open project properties, find the VSIX tab and uncheck all the options:
Finally, build the project. Just two files, SampleVsPackage.dll and SampleVsPackage.pdb, should be generated.
Registering the Package
Until the package can be loaded by Visual Studio, it needs to be registered. The registration is simply writing specific keys into Windows Registry.
To do that, find the Package Registration Utility (RegPkg.exe). It should be located in Visual Studio SDK directory, e.g.:
32-bit OS: c:\Program Files\Microsoft Visual Studio 11.0\VSSDK\VisualStudioIntegration\Tools\Bin\RegPkg.exe
64-bit OS: c:\Program Files (x86)\Microsoft Visual Studio 11.0\VSSDK\VisualStudioIntegration\Tools\Bin\RegPkg.exe
You can copy the tool where it suits you.
Here is a sample usage of RegPkg:
32-bit OS: RegPkg.exe /root:SOFTWARE\Microsoft\VisualStudio\11.0 /codebase SampleVsPackage.dll
64-bit OS: RegPkg.exe /root:SOFTWARE\Wow6432Node\Microsoft\VisualStudio\11.0 /codebase SampleVsPackage.dll
This will write package registration information into the Windows Registry, hence registers the package. Similar call have to be done by your custom installer in order to register the package.
Instead of writing into registry, RegPkg.exe can gereate a REG file (several other formats are available) so that you can write package information into registry using the file. To do that, use /regfile parameter:
32-bit OS: RegPkg.exe /root:SOFTWARE\Microsoft\VisualStudio\11.0 /regfile:SampleVsPackage.ref /codebase SampleVsPackage.dll
64-bit OS: RegPkg.exe /root:SOFTWARE\Wow6432Node\Microsoft\VisualStudio\11.0 /regfile:SampleVsPackage.ref /codebase SampleVsPackage.dll
This creates SampleVsPackge.reg file you can use any time later instead of RegPkg.exe itself.
There are two other options for specifying how the package will be registered: codebase and assembly. When /codebase parameter is used (as in the sample above), the registry will point to the location on disk where your package is located (see Assembly.CodeBase property for more information).
Another option is the /assembly parameter - this assumbes that your VSPackage assembly is located in GAC (Global Assembly Cache). See section Installing the Control in GAC for more information.
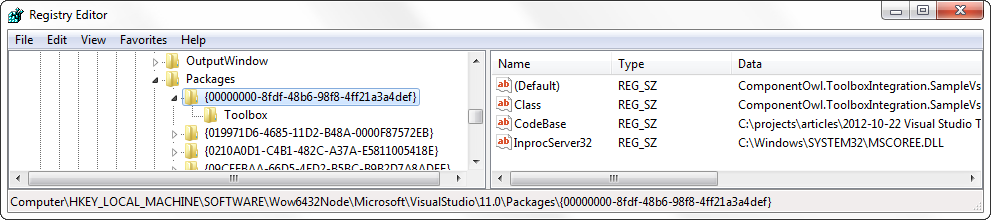
You can check out the registry after the package registration:
Package Registration for Visual Studio 2012/2013
Regrettably, simply registering package is not enough for Visual Studio 2012/2013 to load it (see this blog post). Because of performance optimizations, VS developers removed feature that looks for changes in VS registry root and thus we need to call
devenv.exe /Setup
In order to finish package registration.
This call can be very time consuming since Visual Studio 2012/2013 goes through all extensions and looks for changes. On the other hand, I tried running devenv.exe with /Setup parameter on fresh install of Visual Studio 2012/2013 and it was instant. On older installation, however, the operation took well over a minute (it behaves just like Microsoft Windows, which progressively slows down during its lifetime).
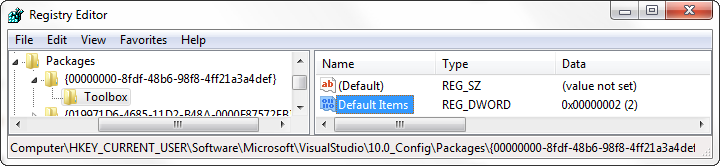
We can speed things up by a little hack. One of the things the /Setup does is copying registry keys from HKLM to Visual Studio's 11.0_Config hive (or 12.0_Config, respectively). We can just write registry under this key instead of calling devenv.exe and avoid possibly lengthy operation.
The hive is located in HKEY_CURRENT_USER\Software\Microsoft\VisualStudio\11.0_Config.
So let's open and edit the SampleVsPackage.reg file we have generated using RegPkg.exe earlier. Here is the modified version where only the registry root has been changed:
REGEDIT4

[HKEY_CURRENT_USER\Software\Microsoft\VisualStudio\11.0_Config\InstalledProducts\SampleVsPackage]
@="#110"
"Package"="{00000000-8fdf-48b6-98f8-4ff21a3a4def}"
"PID"="1.0"
"ProductDetails"="#112"
"LogoID"="#400"
[HKEY_CURRENT_USER\Software\Microsoft\VisualStudio\11.0_Config\Packages\{00000000-8fdf-48b6-98f8-4ff21a3a4def}]
@="ComponentOwl.ToolboxIntegration.SampleVsPackage, SampleVsPackage, Version=1.0.0.0, Culture=neutral, PublicKeyToken=30782fc44cbe0af5"
"InprocServer32"="C:\\Windows\\SYSTEM32\\MSCOREE.DLL"
"Class"="ComponentOwl.ToolboxIntegration.SampleVsPackage"
"CodeBase"="C:\\projects\\articles\\2012-10-22 Visual Studio Toolbox Control Integration\\ToolboxIntegration\\SampleVsPackage\\bin\\Debug\\SampleVsPackage.DLL"
[HKEY_CURRENT_USER\Software\Microsoft\VisualStudio\11.0_Config\Packages\{00000000-8fdf-48b6-98f8-4ff21a3a4def}]
[HKEY_CURRENT_USER\Software\Microsoft\VisualStudio\11.0_Config\Packages\{00000000-8fdf-48b6-98f8-4ff21a3a4def}\Toolbox]
"Default Items"=dword:00000001
The highlighted parts have been edited.
So in addition to standard package registration, we also write in the registry where Visual Studio 2012/2013 user config hive resides. This is sufficient for our VSPackage to load.
However, this is really a hack - editing of user configuration in registry may cause Visual Studio to not load your user settings and show up as when running for the first time. I tried this hack on my machine and it worked, but there may be some hidden glitches. If you want to follow standard procedure, just call "devenv.exe /Setup".
Loading VSPackage
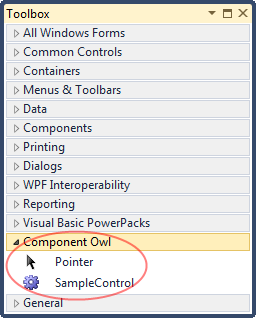
If you did all the previous steps, your package should load when you open Windows Forms Designer and show Toolbox (Cotrol+Alt+X). You can notice your package name displaying in status bar for a while, then SampleControl should show up in the Toolbox under "Component Owl" tab:
Displaying Your Extension in VS About Box
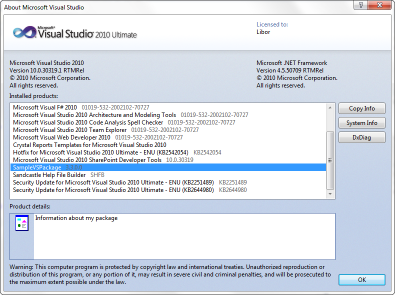
If you want information about your extension to be visible in Visual Studio splash screen and About Box, implement IVsInstalledProduct interface:
...

public sealed class SampleVsPackage : Package, IVsInstalledProduct
{

...

	int IVsInstalledProduct.IdBmpSplash(out uint pIdBmp)
	{
	    pIdBmp = 0;
	    return 0;
	}

	int IVsInstalledProduct.IdIcoLogoForAboutbox(out uint pIdIco)
	{
	    pIdIco = 400;
	    return 0;
	}

	int IVsInstalledProduct.OfficialName(out string pbstrName)
	{
	    pbstrName = "ComponentOwl SampleControl";
	    return 0;
	}

	int IVsInstalledProduct.ProductDetails(out string pbstrProductDetails)
	{
	    pbstrProductDetails = "SampleControl control.\r\nFor more information see http://www.componentowl.com";
	    return 0;
	}

	int IVsInstalledProduct.ProductID(out string pbstrPID)
	{
	    pbstrPID = "3.3.0.0";
	    return 0;
	}

	...

}
This code causes the component to show up in the list of "Installed Products" in Visual Studio about box:
As for the splash screen, Visual Studio 2008 used to display extensions in its splash screen, but later version do not:

Troubleshooting Package Load Failures
You may encounter this dialog when playing with packages:

When you click "No", the package will be skipped later when loading packages. You can re-enable loading all packages by running
devenv.exe /ResetSkipPkgs
To debug package load problem, you can do just what the dialog says. Run
devenv.exe /log
and then take a look on the ActivityLog.xml (path is shown in the dialog). There you can find cause of the problem in one of the "entry" elements:
...
<entry>
  <record>106</record>
  <time>2012/10/26 06:07:36.920</time>
  <type>Error</type>
  <source>VisualStudio</source>
  <description>CreateInstance failed for package [ComponentOwl.ToolboxIntegration.SampleVSPackage, SampleVSPackage, Version=1.0.0.0, Culture=neutral, PublicKeyToken=87379c2b0cde9bc3]</description>
  <guid>{761F0CB7-64C1-4695-91D2-6E3C26C12314}</guid>
  <hr>80070002</hr>
  <errorinfo>Could not load file or assembly 'file:///C:\projects\articles\2012-10-22 Visual Studio Toolbox Control Integration\ToolboxIntegration\SampleVSPackage\bin\SampleVSPackage.DLL' or one of its dependencies. The system cannot find the file specified.</errorinfo>
</entry>
...
In this particular case, the problem was caused by changing output path from "bin\SampleVSPackage.dll" to "bin\Debug\SampleVSPackage.dll" so the file does not longer exist at the location for which it is registered. The solution is to either change the location back or unregister the package (i.e. remove the corresponding registry entries - the GUID is provided in the log).
Past Troubles with Package Load Keys
The above problem with package load failure happened on Visual Studio 2005 and 2008 because a Package Load Key (PLK) had to be provided by the VSPackage. The PLK is basically a hashcode computed from metadata about package (name, author/company, version). The PLK had to be obtained from a website provided by Microsoft.
I believe PLK caused many troubles and headaches to developers, including myself.
This is no longer relevant for Visual Studio 2010 and newer (requirement for PLKs removed), so we won't discuss this topic in more depth
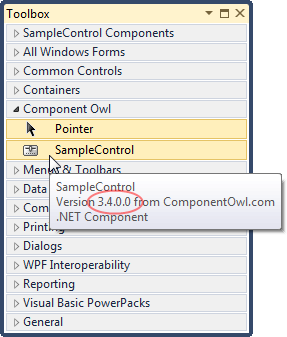
Update Control Already Installed in Toolbox
Suppose we have already integrated SampleControl version 3.3.0.0 in the Visual Sudio Toolbox:
We would like to update this control to version 3.4.0.0.
First of all, we update assembly information of the SampleControl project:
If we "deploy" (copy) SampleControl.dll to the folder with SampleVsPackage.dll where it is registered, the SampleControl will no longer be visible in Toolbox, because the control in Toolbox should still be 3.3.0.0 and this version is no longer to be found.
You don't need to increment assembly version of the SampleVsPackage project, but at least you have to increment parameter of the ProvideToolboxItems attribute:
[PackageRegistration(UseManagedResourcesOnly = true)]
[InstalledProductRegistration("#110", "#112", "1.0", IconResourceID = 400)]
[Guid(GuidList.guidSampleVsPackagePkgString)]
[ProvideToolboxItems(2)]
public sealed class SampleVsPackage : Package, IVsInstalledProduct
{
	...
}
The package need to be re-registered (see section Registering the Package) which will effectively update just the "Default Items" value in the Toolbox key:
This will cause Visual Studio to update your control in the Toolbox:
Remove Control from the Toolbox
Now we would like to remove control from the Visual Studio Toolbox. This step can be done by custom uninstaller.
One way to do that is to simply unregister the VSPackage using RegPkg.exe:
32-bit OS: RegPkg.exe /unregister /root:SOFTWARE\Microsoft\VisualStudio\10.0 SampleVsPackage.dll
64-bit OS: RegPkg.exe /First of all, we update assembly information of the unregisFirst of all, we update assembly information of the ter /root:SOFTWARE\Wow6432Node\Microsoft\VisualStudio\10.0 SampleVsPackage.dll
You can also do this manually by simply removing the registry entry of the corresponding package, e.g.:
32-bit OS: HKLM\SOFTWARE\Microsoft\VisualStudio\10.0\Packages\{a9696de6-e209-414d-bbec-a0506fb0e924}
64-bit OS: HKLM\SOFTWARE\Wow6432Node\Microsoft\VisualStudio\10.0\Packages\{a9696de6-e209-414d-bbec-a0506fb0e924}
On Visual Studio 2012/2013, the key need to be removed in user config registry hive or call "devenv.exe /Setup" after removing the registry key in HKLM. For more information, see section Package Registration for Visual Studio 2012/2013.
9. Toolbox Integration using VSIX Packages
Microsoft have removed most /po f the drawbacks of VSI packages by introducing VSIX. The price is that VSIX is a little bit more complicated and Visual Studio 2008 is no longer supported.
There are two versions of VSIX Schema. Version 1.0 is what Visual Studio 2010 understand. There is also version 2.0 for Visual Studio 2012/2013. We want a VSIX Package compatible with both, so we will work in Visual Studio 2010.
Create a new Project from Template
If you have Visual Studio 2010 SDK installed, you can create a new VSIX package project with control from a template.
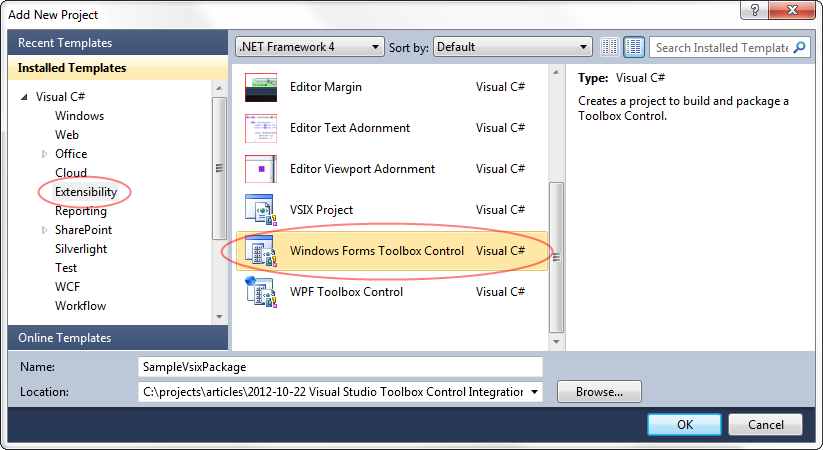
Select "File - New - Project.." (Control+Shift+N) and then select the "Windows Forms Toolbox Control" or "WPF Toolbox Control" template:
The projects is basically a VSPackage wrapped in VSIX container after build. The package assembly also contain the control class named ToolboxControl.
There are three important files generated by the template:
- ProvideToolboxControlAttribute.cs - This is attribute for ToolboxControl class. We will discuss it later.
- source.extension.vsixmanifest - This is manifest XML file for our VSIX package. It contains all information about the package and what it contains.
- ToolboxControl.cs - This is a sample control to be installed in Visual Studio Toolbox.
Create a new Project from VSPackage
We can also start with VSPackage like the one we have already created in previous section. I will create a new VSPackage project (as in previous chapter), name it SampleVsixPackage and configure it according to "Windows Forms Toolbox Control" template to show you all the differences.
The basic configuration of source.extension.vsixmanifest is the same as in previous chapter.
Project properties differs from VSPackage we have created earlier on the VSIX tab, where we have the first two check boxes checked:
Update the Manifest File
Double-click on the source.extension.vsixmanifest file to open up the VSIX Manifest Designer:
If you are not sure about some part of the form, please take a look on section Create VSPackage Project, where the form is described in more detail.
In addition to previous VSPackage project, I have also filled the following optional boxes:
- License Terms - If you have EULA or other licence in TXT or RTF format, you can browse for it.
- Icon - You can browse for an icon representing the extension. It should be 32x32 pixels large, PNG, BMP, JPEG or ICO image format.
- Preview Image - Thumbnail image representing the extension. It should be 200x200 pixels large, PNG, BMP or JPEG image format.
- More Info URL - URL of a website containing more information about the extension.
- Getting Started Guide - URL of a website with documentation; you can also provide relative path to HTML file with the local documentation.
Add Control
Let's create a new WPF control within the SampleVsixPackage project itself. I will name it SampleWpfControl to distinguish it from SampleControl we have created earlier.
To ensure our control will show up in Toolbox of Visual Studio 2012/2013, we have to decorate the SampleWpfControl class by ProvideToolboxControlAttribute:
[ProvideToolboxControl("SampleWpfControl", true)]
public partial class SampleWpfControl : UserControl
{
	...
}
You also have to provide implementation of the attribute class:
[AttributeUsage(AttributeTargets.Class, AllowMultiple = false, Inherited = true)]
[System.Runtime.InteropServices.ComVisibleAttribute(false)]
public sealed class ProvideToolboxControlAttribute : RegistrationAttribute
{
	private const string ToolboxControlsInstallerPath = "ToolboxControlsInstaller";

	public ProvideToolboxControlAttribute(string name, bool isWpfControls)
	{
		if (name == null)
		{
			throw new ArgumentException("name");
		}

		this.Name = name;
		this.IsWpfControls = isWpfControls;
	}

	private bool IsWpfControls { get; set; }
	private string Name { get; set; }

	public override void Register(RegistrationAttribute.RegistrationContext context)
	{
		if (context == null)
		{
			throw new ArgumentNullException("context");
		}

		using (Key key = context.CreateKey(String.Format(CultureInfo.InvariantCulture, "{0}\\{1}",
														 ToolboxControlsInstallerPath,
														 context.ComponentType.Assembly.FullName)))
		{
			key.SetValue(String.Empty, this.Name);
			key.SetValue("Codebase", context.CodeBase);
			if (this.IsWpfControls)
			{
				key.SetValue("WPFControls", "1");
			}
		}

	}

	public override void Unregister(RegistrationAttribute.RegistrationContext context)
	{
		if (context != null)
		{
			context.RemoveKey(String.Format(CultureInfo.InvariantCulture, "{0}\\{1}",
														 ToolboxControlsInstallerPath,
														 context.ComponentType.AssemblyQualifiedName));
		}
	}
}
This code is generated if you create project from template.
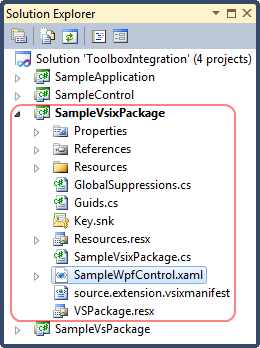
The project in Solution Explorer should look like this:
Adding Controls from Other Projects
What if we would like to use SampleControl.dll as in the VSI package scenario?
Of course, we can click "Add Content" in the VSIX Manifest designer and simply add "Toolbox Control" content from other project:
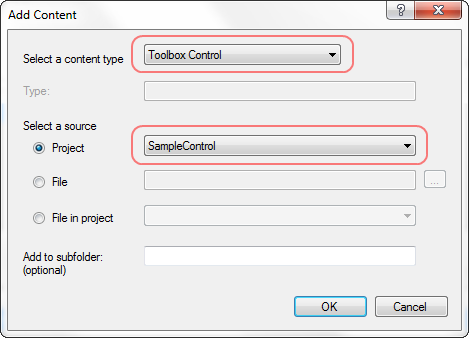
However, this is possible only if the SampleControl project itself is a package project!
Lucklily, since the VSIX package is still just a ZIP archive, we can take a look on how to add such external DLLs to it manually.
Setting Up VSIX Installer
The VSIX Installer tool (VsixInstaller.exe) is located in Visual Studio's binary folder:
32-bit OS: c:\Program Files\Microsoft Visual Studio 11.0\Common7\IDE\VSIXInstaller.exe
64-bit OS: c:\Program Files (x86)\Microsoft Visual Studio 11.0\Common7\IDE\VSIXInstaller.exe
You can hit F6 and Visual Studio will build your project to create SampleVsixPackage.vsix file. This is our VSIX package.
The VSIX Installer should be associated with the .VSIX file extension, so it is usually possible to just double-click on the file and see the VSIX installer.
The installation can fail in the very first step:

This problem appears if you have invalid manifest file. If this happen, open source.extension.vsixmanifest and fill in all missing data. Furthermore, you can check if the XML is valid according to VSIX Extension Schema.
Now we are able to rebuild and run the VSIX installer again:
Make the VSIX Package Compatible with Visual Studio 2012/2013
To make our VSIX package working with Visual Studio 2012 and newer, we need to manually update the manifest file. Select the source.extension.vsixmanifest file and press F7 (View Code):
<?xml version="1.0" encoding="utf-8"?>
<Vsix xmlns:xsi="http://www.w3.org/2001/XMLSchema-instance" xmlns:xsd="http://www.w3.org/2001/XMLSchema" Version="1.0.0" xmlns="http://schemas.microsoft.com/developer/vsx-schema/2010">
  <Identifier Id="ComponentOwl.ToolboxControl.Express">
    <Name>Component Owl</Name>
    <Author>ComponentOwl.com</Author>
    <Version>1.0</Version>
    <Description xml:space="preserve">Windows Forms Toolbox Control</Description>
    <Locale>1033</Locale>
    <MoreInfoUrl>http://www.componentowl.com/toolbox-control</MoreInfoUrl>
    <License>license.rtf</License>
    <GettingStartedGuide>http://www.componentowl.com/documentation/toolbox-control</GettingStartedGuide>
    <Icon>icon.png</Icon>
    <PreviewImage>overview.jpg</PreviewImage>
    <SupportedProducts>
      <VisualStudio Version="10.0">
        <Edition>Ultimate</Edition>
        <Edition>Premium</Edition>
        <Edition>Pro</Edition>
      </VisualStudio>
      <VisualStudio Version="11.0">
        <Edition>Ultimate</Edition>
        <Edition>Premium</Edition>
        <Edition>Pro</Edition>
      </VisualStudio>
      <VisualStudio Version="12.0">
        <Edition>Ultimate</Edition>
        <Edition>Premium</Edition>
        <Edition>Pro</Edition>
      </VisualStudio>
    </SupportedProducts>
    <SupportedFrameworkRuntimeEdition MinVersion="4.0" MaxVersion="5.0" />
  </Identifier>
  <References />
  <Content>
    <ToolboxControl>|%CurrentProject%;PkgdefProjectOutputGroup|</ToolboxControl>
  </Content>
</Vsix>
The bolded text have been added. I have simply added a new VisualStudio element with higher version and all the editions (they are relevant for VS 2012 and 2013 as its own template also generates these).
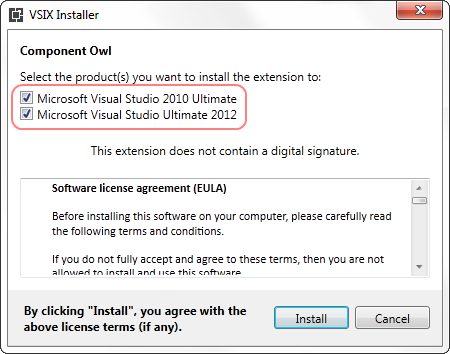
The VSIX installer will show Visual Studio 2012 options as well after this update (if installed, of course):
Please note that Visual Studio 2012/2013 also works with 2.0 version of the schema, so if you create VSIX package in Visual Studio 2012/2013, it won't be compatible with 2010. The solution is hence to use 1.0 version of the schema and add support for newer Visual Studio as described earlier.
A great advantage over VSI package is that installation of Toolbox control is really fast with VSIX.
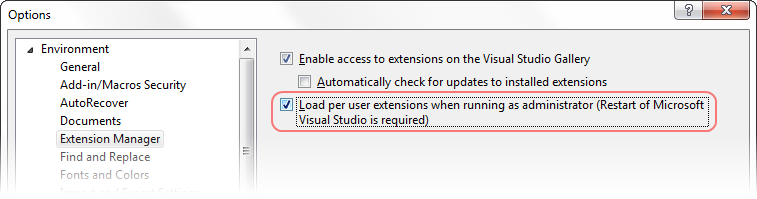
Regrettably, the control won't show up in Visual Studio 2012/2013 Toolbox in its default configuration. You need to enable loading-per user extensions (this option is enabled by default in Visual Studio 2010):
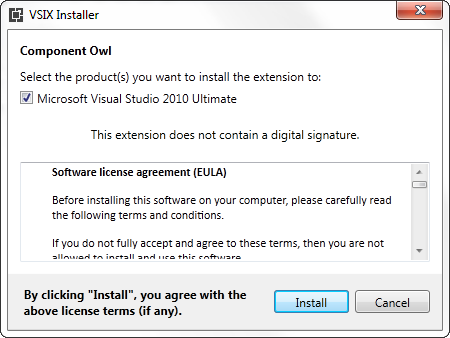
Signing the VSIX Package
Unlike older VSI package, there is no nag screen when the package is not signed. Instead, a label appears informing user that the package is not signed.
To sign a VSIX package, we need PackageSignatureManager from System.IO.Packaging (WindowsBase.dll). I made a simple command-line application called SignVsix (you can find it in sample source code) that takes three arguments (VSIX file path, PFX certificate path and password for the certificate):
using System;
using System.Collections.Generic;
using System.IO;
using System.IO.Packaging;
using System.Security.Cryptography;
using System.Security.Cryptography.X509Certificates;

internal class Program
{
	private static void Main(string[] args)
	{
		// first argument - path to VSIX package
		string paramPathPackage = args[0].Replace("\"", "");
		// second argument - path to PFX certificate
		string paramPathCertificate = args[1].Replace("\"", "");
		// third argument - password for the certificate
		string paramPassword = args[2];

		// open VSIX package
		Package package = Package.Open(paramPathPackage, FileMode.Open);

		// load certificate
		byte[] certificate = File.ReadAllBytes(paramPathCertificate);

		// sign all parts of the package
		var signatureManager = new PackageDigitalSignatureManager(package)
		{
			CertificateOption = CertificateEmbeddingOption.InSignaturePart
		};

		List<Uri> partsToSign = new List<Uri>();

		foreach (PackagePart packagePart in package.GetParts())
		{
			partsToSign.Add(packagePart.Uri);
		}

		partsToSign.Add(PackUriHelper.GetRelationshipPartUri(signatureManager.SignatureOrigin));
		partsToSign.Add(signatureManager.SignatureOrigin);
		partsToSign.Add(PackUriHelper.GetRelationshipPartUri(new Uri("/", UriKind.RelativeOrAbsolute)));

		try
		{
			signatureManager.Sign(partsToSign, new X509Certificate2(certificate, paramPassword));
		}
		catch (CryptographicException cryptographicException)
		{
			Console.WriteLine("Signing failed: {0}", cryptographicException.Message);
		}
	}
}
The usage is very simple:
SignVsix.exe SampleVsixPackage.vsix certificate.pfx abc123
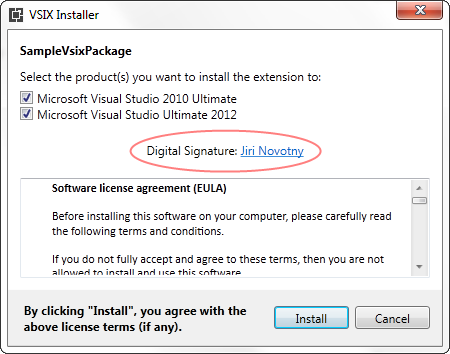
When the file is signed, VSIX Installer shows label "Digital Signature: <Author Name>" on the first page:
Dissecting the VSIX Package
If you look on the project references, you can see reference to Microsoft.VisualStudio.Shell.Immutable.10. This reference points to Visual Studio 2010 SDK and we cannot expect this dependency present on end-user's machine. This library contains ProvideToolboxControlAttribute class, which is used by our ToolboxControl.
Since a software development company may want to develop many components, it would be nice to have an universal VSIX package which can be adjusted for any control.
Let's take a look on the ToolboxControl.vsix. It is simply a ZIP archive containing the manifest, resources, ToolboxControl binary and a ToolboxControl.pkgdef file. If we look through all its content, we easily generate our own VSIX packages on demand, even without Visual Studio. There should also be a programmatic way on generating VSIX packages using classes from System.IO.Packaging.
Update Toolbox Control via VSIX Package
If you made changes to your control and want to re-install the package, an error message appear:
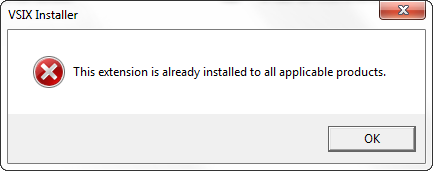
In order to provide an update, you need to increment version number in the VSIX manifest:
You can also increment version number in the Package class attribute, but this is not necessary for the VSIX to perform update:
[InstalledProductRegistration("#110", "#112", "2.0", IconResourceID = 400)]
[Guid(GuidList.guidSampleVsixPackagePkgString)]
public sealed class SampleVsixPackage : Package
{
	...
}
Of course, you can also increment version of the assembly.
Uninstall the VSIX Package
The VSIX Installer can be used to uninstall control from the Toolbox via /uninstall parameter followed by package ID (the constant located in Guids.cs: GuidList.guidSampleVsixPackagePkgString):
VSIXInstaller.exe /uninstall:e3dfd099-d0ab-4b8e-b26d-639032c29ad9
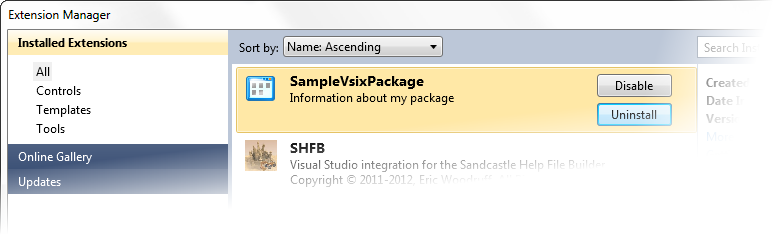
It is also possible to uninstall VSIX Package manually using Extension Manager (Tools - Extension Manager...). In Visual Studio 2012/2013, the corresponding dialog is called Extensions and Updates (Tools - Extensions and Updates...).
Quiet Mode
Both installation and uninstallation can be performed in quiet mode by using /quiet parameter. This will suppress user interface of the installer, which is handy when you want to automate Toolbox control integration with your custom installer.
10. Supporting Multiple Version of .NET Framework
Since .NET Framework is backward-compatible, building a component on lowest possible framework ensures compatibility with higher versions as well.
I heard from several users that the component may not be displayed in Toolbox although it seems that the Toolbox respects the .NET compatibility and display .NET 2.0 component even when working in .NET 4.0 (Client Profile) project.
There is also a scenario where you want to support additional features from higher version of .NET (for example, drawing text using GDI+ in .NET 2.0 and drawing text using WPF in .NET 3.5 and higher). You may also want to add extensive Windows Forms Designer support, which is not available in Client Profile framework.
The solution to this is to build several DLLs, each with different features and possibly different target frameworks. Then integrate all the assemblies.
This does not pose a problem when DTE approach is used, alhtough it is better to give each version of the component unique name or place them in separate tabs (e.g. "Component Owl WinForms - .NET 2.0").
When TCI approach is used, each version of the assembly requires different public key token, because they have to reside in GAC side-by-side. Furthermore, they need a separate registry key based on the public key token.
The VSI and VSIX approaches require renaming the component or customizing Toolbox tab in the ProvideToolboxControlAttribute (see part Toolbox Control Integration using VSIX Packages for more information).
The VSPackage approach allows you to place all the versions in Visual Studio Toolbox under their respective tabs.
When manual approach is used, you can of course add each version of the assembly separately and also create separate tabs in the Toolbox.
11. Sample Source Code
The attached sample source is a Visual Studio 2010 Solution containing implementations of all the presented approaches. The binaries are contained under "bin\Release" subfolders and batch files (.CMD extension) are provided where appropriate.
Download sample source code (212 KB)
You can find the following folders in the archive:
DteToolboxInstaller - A command-line application for installing/uninstalling assemblies in VS Toolbox using Visual Studio Automation Object Model (DTE). Custom tab name and VS version can be specified. The tool can be used in real-world application.
SampleControl - Windows Forms control for testing the integration.
SampleVsixPackage - VSIX package project (basically a VSPackage that is further packaged with the sample control), the resulting package can be installed by VSIX Installer that comes with Visual Studio.
SampleVsPackage - VSPackage that is able to install all control assemblies located in its own folder. Contains batch files for package registration/unregistration.
SignVsix - A command-line application for signing VSIX packages. Sample batch file is provided. Valid PFX certificate need to be provided by the user.
TciToolboxInstaller - A command-line application for installing/uninstalling assemblies in VS Toolbox using Toolbox Control Installer package (but does not depend on it). Custom tab name and VS version can be specified. The tool can be used in real-world application.
VSI - Basic setting for creating VSI package and a sample VSI package created from the files. Batch file for signing the VSI package is provided.
Download sample source code (212 KB)

This work is licensed under a Creative Commons Attribution 3.0 Unported License.Component Owl WinForms - .NET 2.0
Better ListView
